
Hello everyone, I hope you enjoyed your weekend! To start the week, today I will share with you this really cute DIY ...
Bonjour à tous, j'espère que vous avez bien profité de votre week-end ! Pour commencer la semaine, je vais aujourd'hui partager avec vous ce DIY vraiment trop mignon...
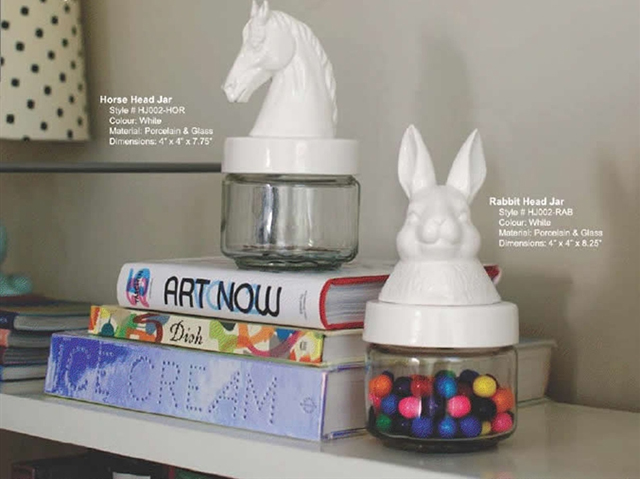
As you know, a few months ago my little nieces aged 4 and 7 "hired" me to redecorate their bedroom. In the coming days, I'll finally show you the pictures of this girls bedroom makeover ... But before that, I will share with you the latest little DIY I made for these pretty young ladies. To complete the decor of the room, I thought it would be a good idea to add small jars in which they could put their sweets, beads and all other treasures. Searching online I came across the rabbit head jar just above and I loved the large and cute lid. With the large rabbit this glass jar becomes a beautiful decorative object! So I decided to make my own bunny jars.
Comme vous le savez, il y a quelques mois de cela j'ai été chargée par mes petites nièces de 4 et 7 ans de redécorer leur chambre. Dans les prochains jours, je vais enfin vous montrer les photos du relooking de cette chambre de fille... Mais avant cela, je vais partager avec vous les derniers petits DIY que j'ai fait pour ces jolies demoiselles. Pour compléter la décoration de la chambre, je me suis dit qu'il serait bien qu'elles aient des petits bocaux dans lesquels elles puissent mettre leurs bonbons, leurs perles et tous leurs petits trésors. En cherchant un peu, je suis tombée sur le bocal lapin juste au-dessus et j'ai aimé ce gros couvercle mignon. La grande taille du lapin fait de ce bocal est un bel objet de décoration ! J'ai donc voulu créer mes propres bocaux lapins.

For this small DIY I only needed:
- A jar
- A rabbit
- Glue
- Spray Paint
- Spray Varnish (optional)
Pour ce petit DIY il m'a simplement fallu :
- Un bocal
- Un lapin
- Colle
- Peinture en spray
- Vernis en spray (facultatif)

So here are my two items that soon will become one: an Ikea Burken jar and a resin rabbit.
Voici donc mes deux objets qui n'en feront bientôt plus qu'un : un bocal Burken d'Ikea et un lapin en résine.

First take the glass jar and remove the lid.
Tout d'abord prenez le bocal et ôtez le couvercle.

You must then remove the handle that is on the lid. I did it very easily with a simple plier.
Il faut ensuite enlever la poignée qui se trouve sur le couvercle. Je l'ai fait très facilement à l'aide d'une simple pince.

Now that you removed the handle, your lid is in two parts because the hermetic part that was inside the lid was attached by the handle.
Maintenant qu'il n'y a plus de poignée, votre couvercle en deux partie, puisque la partie hermétique qui était à l'intérieur du couvercle était fixée par la poignée.
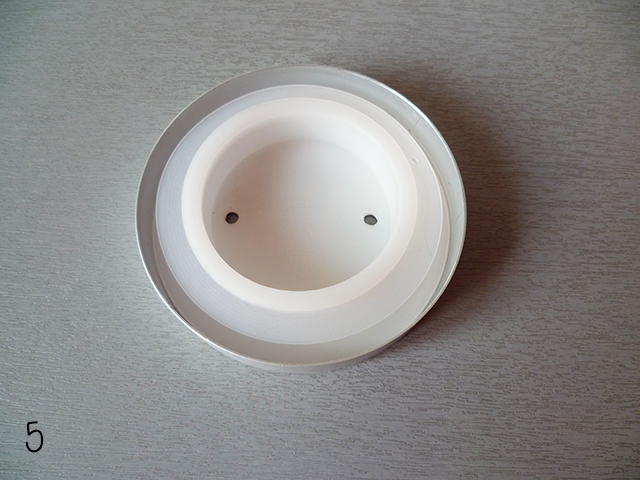
To reattach this hermetic part to the lid, you just have to paste it.
Pour fixer à nouveau cette partie hermétique au couvercle, il suffit juste de la coller.

Then you can paste your bunny on the lid.
Ensuite, vous pouvez coller votre lapin sur le couvercle.

Finally, you can paint it with spray paint using the color of your choice. I also put spray varnish to protect the paint and make it shine, but this is optional.
Vous pouvez enfin le peindre avec de la bombe en spray de la couleur de votre choix. J'ai également mis du vernis en spray pour protéger la peinture et la faire briller mais ceci est facultatif.

And here is your lovely bunny jar!
Et voilà votre joli bocal lapin !

Cute, is not it?
Mignon, n'est-ce pas ?

Image 2 source Hattan Home
10 juin 2013 - 18 h 01 min
C’est trop mignon, j’adore :D
Bisous
Mamie lotte
10 juin 2013 - 22 h 08 min
Great tutorial! That is such an amazing idea. I’m going to have to try it!
xox Lara http://www.weheartbeautyblog.com
11 juin 2013 - 4 h 13 min
I LOVE these! I have a slew of beads with out homes and I just recently threw out a mini collection of baby food jars that I wasn’t sure why i was saving. Well now that they’re gone I figured it out! Dang!
11 juin 2013 - 8 h 23 min
j’adore !
11 juin 2013 - 14 h 36 min
I love it!!! so cute! I especially like the size of the bunny….I did a similar DIY a while ago…but with the little animal figures and ball jars….so cute!! My daughter loves them!
1 janvier 2014 - 22 h 14 min
[…] You have all the details of this cute hack on my blog just here! […]
1 janvier 2014 - 23 h 23 min
[…] You have all the details of this cute hack on my blog just here! […]
1 janvier 2014 - 23 h 38 min
[…] You have all the details of this cute hack on my blog just here! […]
2 janvier 2014 - 16 h 40 min
So pretty and adorable!
23 février 2014 - 11 h 59 min
So cute! I love it!